When you finish an Altoid tin, you usually don’t plan to keep it.
You hold that small metal box in your hand, and you start wondering, should you throw it away or should you keep it?
It feels too nice to toss, but you also don’t really know what you could do with it.
When you decide to decorate it, you might quickly feel confused. Should you use paint, or should you use paper?
When you try paint, you might notice it can chip off, and you start thinking you did something wrong.
If you use paper, you might see wrinkles, and you wonder how you could make it look neat instead of messy.
You might even feel stuck because you want it to look clean, not like a failed craft.
And when you don’t know what step you should take next, you could easily give up and leave the tin unused. That’s exactly where you usually get stuck.
In this article, you will learn exactly what you can do, step by step, using simple materials that you can easily find.
Why Should You Decorate Altoid Tins?
If you’ve ever finished a pack of Altoids, you’ve probably noticed how hard it is to throw the tin away.
You hold it in your hand, and you might think it’s too small to matter, but you can also feel it’s too good to toss.
It’s small, strong, and shuts tightly, and you might wonder what you could possibly do with it. But then you set it aside, because you don’t know where you should start.
That’s when decorating an Altoid tin can make sense. Instead of letting it sit around or throwing it away, you can turn it into something useful and personal.
You don’t need much time, and you don’t need complicated materials, you just need a simple idea, and you can easily change that plain metal box into something you’ll actually use.
Another reason you might like this DIY is how simple it can be. You don’t need special tools, and you don’t have to buy expensive supplies.
Even if you’ve never done crafts before, you can still get a clean result when you follow the right steps and take your time.
Once you finish, you might be surprised by how practical it can become. You can use it to store jewelry, sewing supplies, earbuds, or even turn it into a small first aid kit.
If you want to make something thoughtful, you could even turn it into a small gift box, and you can add a personal touch without spending extra money.
And when you see the final result, you might feel that quiet satisfaction, because you took something small and unused, and you turned it into something neat and useful.
It’s a quick project, but you’ll probably feel like it was worth your time.
So if you’re looking for an easy way to reuse something you already have, and you want to make it look good at the same time, decorating an Altoid tin is something you should definitely try.
What Materials Should You Use?
This is where you might start feeling confused and honestly, this is where your project could easily go wrong.
When you look at an Altoid tin, you might forget that it’s metal, and you might try to treat it like paper or cardboard.
But if you use the wrong paint or glue, you could see your design peel off, chip, or end up looking messy.
To keep things simple, you only need to focus on a few materials that actually work. For the base, you can either use paint or paper.
If you want a clean and simple look, you can go with acrylic paint or spray paint. You might find acrylic paint easier to control, especially when you want small designs.
When you use spray paint, you can get a smoother finish, especially if you apply thin layers and take your time.
If you want better results, you should use a metal primer first, because it can help your paint stick properly and last longer.
If you like patterns, you might prefer using scrapbook paper or wrapping paper. When you apply it, you should use Mod Podge or a similar glue that can also seal your design.
This can help your paper stick smoothly, and you won’t have to worry about damage later.
If you use regular school glue, you might notice wrinkles, and you could struggle to keep it neat, especially on metal.
For decoration, you don’t need anything fancy. You can use simple things like stickers, washi tape, fabric pieces, ribbon, or small buttons.
When you choose just a few items that match your style, you can keep your design clean instead of overcrowded.
For the inside, you should use felt or soft fabric because it can give you a neat finish and also protect what you store inside.
And if you want your design to last, you should seal everything with a thin layer of Mod Podge or clear sealant. This can help prevent scratches and keep your tin looking neat over time.
When you start with the right materials, you’ll notice the whole process becomes easier, and you can turn your Altoid tin into something that looks clean, polished, and well-made instead of messy.
Choose a Decorating Method That Works for You
Before you start decorating your Altoid tin, you should decide how you want to decorate it.
When you choose your style first, you can stay focused, and you won’t end up mixing too many ideas.
If you start without a plan, you might add too much, and your final result could look messy.
But when you pick one method from the beginning, you can make everything easier, from choosing materials to getting a clean finish.
The easiest way to begin is when you choose one of three simple methods.
The first option is painting your tin. If you want something simple and neat, you can start with paint.
You can paint the whole tin in one color, or you could add small designs like dots or lines.
You don’t need many supplies, and you can easily try this even if you’re just starting.
When you paint, you should use thin layers, so your paint can dry evenly and won’t chip later.
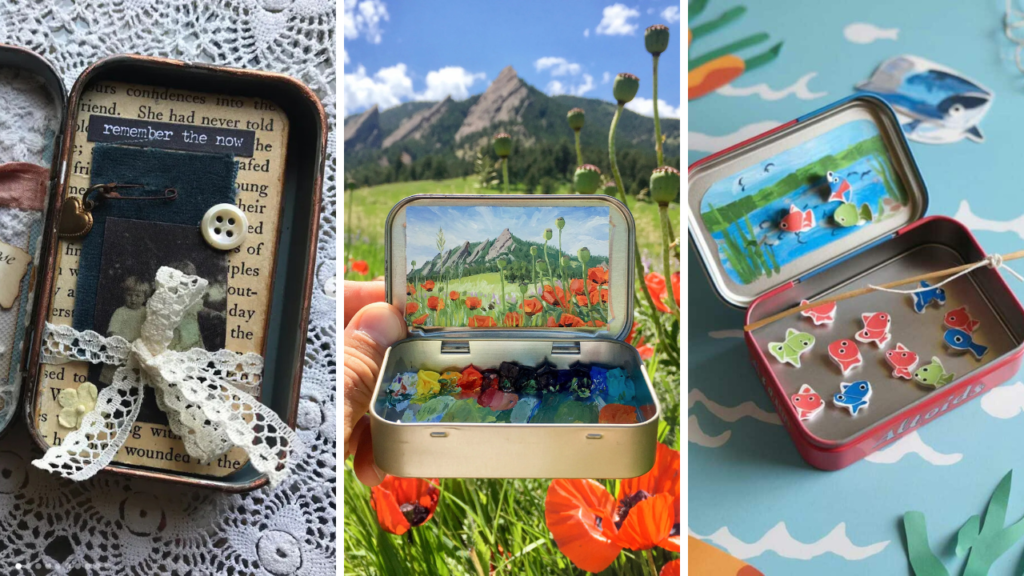
The second option is covering your tin with paper. If you want something decorative without too much effort, you can use scrapbook paper, wrapping paper, or even magazine pages.
You can cut the paper to fit your tin, and you should stick it using Mod Podge or a similar glue.
When you choose a nice pattern, you can get a smooth and stylish finish without much work. The third option is using fabric and small decorations.
If you want your tin to feel more creative and unique, you can add fabric, ribbon, lace, or small items like buttons and charms.
You can add texture and detail, but you should keep it simple so your design doesn’t look crowded.
You don’t need to use all three methods. In fact, you should choose one main method and stick with it.
When you keep your design simple, you can make your Altoid tin look clean, neat, and well put together.
How to Decorate an Altoid Tin Step by Step
If you follow the right steps, you’ll notice decorating an Altoid tin can actually feel very simple.
You just need to take it one step at a time, and you shouldn’t rush the process. When you slow down, you can avoid messy results and keep everything looking clean.
First, you should clean your tin properly. You can wash it with soap and water so you can remove dust, oil, or mint residue.
When you finish, you must dry it completely before you move on.
If you want better results, you could lightly sand the surface, because this can help your paint or glue stick better to the metal.
Next, you should choose your method, paint or paper, and you should prepare your materials before you start.
If you’re painting, you can keep your brush, paint, and cloth ready. If you’re using paper, you should cut it to the size of the lid and sides before you apply glue.
When you prepare first, you can save time and keep things neat.
Now you can start with the base. If you’re painting, you should apply a thin coat and let it dry.
You shouldn’t use thick layers because they can take longer to dry and might look uneven.
When the first coat dries, you can apply a second thin layer if you need it.
If you’re using paper, you should apply a thin layer of Mod Podge, place the paper carefully, and gently press it down so you can remove air bubbles.
After you finish the base, you must let it dry completely before you move forward. If you rush here, you might see everything shift or wrinkle, and you could ruin your design.
When it’s dry, you can start adding decorations. You can use stickers, ribbon, fabric, or small items like buttons.
You should keep things simple, and you should place everything carefully so your design doesn’t look crowded. When you keep it clean, you can make your tin look much better.
Next, you should seal your design. You can apply a thin layer of Mod Podge or clear sealant over the surface.
This can protect your work and help it last longer. You must let it dry fully before you use the tin.
Finally, you shouldn’t forget the inside. You can leave it plain, or you could line it with felt or fabric to give it a cleaner, softer look. This can also help protect whatever you store inside.
If you follow these steps in order, and you give each layer time to dry, you’ll see your Altoid tin turn out neat, clean, and something you’ll actually feel good using or even gifting.
Mistakes to Avoid So Your Tin Doesn’t Look Messy
Most of the time, you don’t struggle with decorating an Altoid tin because it’s hard, you struggle because of a few small mistakes that can ruin the final look.
If you avoid these, you can instantly make your tin look cleaner and more polished.
One common mistake is when you skip the cleaning step. If your tin has oil, dust, or leftover residue, your paint or glue might not stick properly.
When this happens, you could see peeling or uneven surfaces later. So before you start, you should always clean and dry your tin.
Another mistake happens when you use too much glue. You might think more glue will hold things better, but you’ll notice it can actually make things worse.
When you apply too much, your paper could wrinkle, and your finish might look messy.
You should use a thin, even layer, and you can gently press it down to smooth everything out.
You might also apply thick layers of paint without realizing it. When you do this, your surface can look uneven, and your paint might take longer to dry.
In some cases, you could even see cracks later. If you use thin layers instead, you can get a smoother and cleaner result.
Another big mistake is when you don’t let each layer dry properly. If you rush and move too quickly, your design might shift, wrinkle, or smudge.
When you give it a little more time, you can keep everything neat and clean.
You might also feel tempted to add too many decorations at once. When you get excited, you could try to use everything you have.
But when you add too much, your tin might look crowded and unbalanced. If you keep your design simple, you can make it look much better.
Lastly, you shouldn’t skip sealing your final design. If you don’t seal it, your work could scratch, peel, or fade over time.
When you apply a thin layer of Mod Podge or sealant, you can protect everything and keep it looking neat.
If you avoid these small mistakes, you’ll notice your Altoid tin not only looks better, you’ll also find it lasts much longer.
Conclusion
Decorating an Altoid tin doesn’t have to feel complicated.
Once you understand the right materials, and when you follow simple steps, you’ll notice the whole process can become easy and enjoyable.
You don’t need a lot of supplies, and you don’t need experience, you just need a clear plan, and you should give yourself a little patience.
The best part is when you turn something small and unused into something useful and personal.
You can use it for storage, you could turn it into a gift, or you might just decorate it for fun.
When you finish, you’ll notice a well-decorated tin can actually feel special.
You should start simple, and you should stick to one style so you can keep your design clean.
Once you get comfortable, you can try new ideas, and you might start getting more creative.
Even if it’s your first tin, you can still get great results when you follow the basics.
So instead of throwing that empty tin away, you can turn it into a small project.
When you take a little time, you can create something you’ll actually use and something you might even enjoy every time you see it.

Hi, my name is Zeeshan, and I am the founder of The Crafts Geek. I have been passionate about DIY projects, home organization, and creative problem-solving for years. Over time, I realized that simple storage solutions and practical DIY ideas can make a huge difference in how a home looks and functions.