
A DIY fountain sounds simple until you start thinking about the pump, water flow, leaks, algae, and where it should actually sit.
You may want that soft water sound in your backyard, but you do not want a project that becomes messy after one week.
The good thing is, you do not need a big budget or a professional setup. With the right container, a small pump, and a smart placement, you can create a fountain that looks beautiful and works for your space.
In this article, I am going to share 26 DIY fountain ideas that can help you create a relaxing water feature without making the project feel too hard.
How to make a fountain at home DIY?
If you want to make a fountain at home, start with the container first. The container decides how much water your fountain can hold, where the pump will sit, and how often you may need to refill it.
A deep bowl, large planter, ceramic pot, galvanized tub, or old birdbath can work well as long as it can hold water without leaking.
After that, choose a small submersible pump. This pump sits inside the water and pushes the water up through a tube or fountain head. If you want a soft trickle, use a small adjustable pump.
If you want stronger water sound, you need a pump with more power and a slightly taller setup.
Before you add water, seal any drainage holes in the pot or bowl. If you skip this step, the fountain may leak from the bottom and slowly lose water. Use waterproof sealant and let it dry properly before you test the fountain.
Then place the pump inside the container and hide it with smooth stones, gravel, or a smaller pot. Do not bury the pump too deeply because you still need to clean it later. If leaves, dirt, or algae block the pump, the water flow can become weak.
Pick the right spot before you finish the setup. If you place the fountain under a messy tree, leaves can fall into the water every day. If you place it in full sun, algae can grow faster. A bright spot with some shade usually works better.
Once everything is ready, fill the container with water, turn on the pump, and adjust the flow until the water moves without splashing out. A good DIY fountain should look nice, sound peaceful, and stay easy to clean.
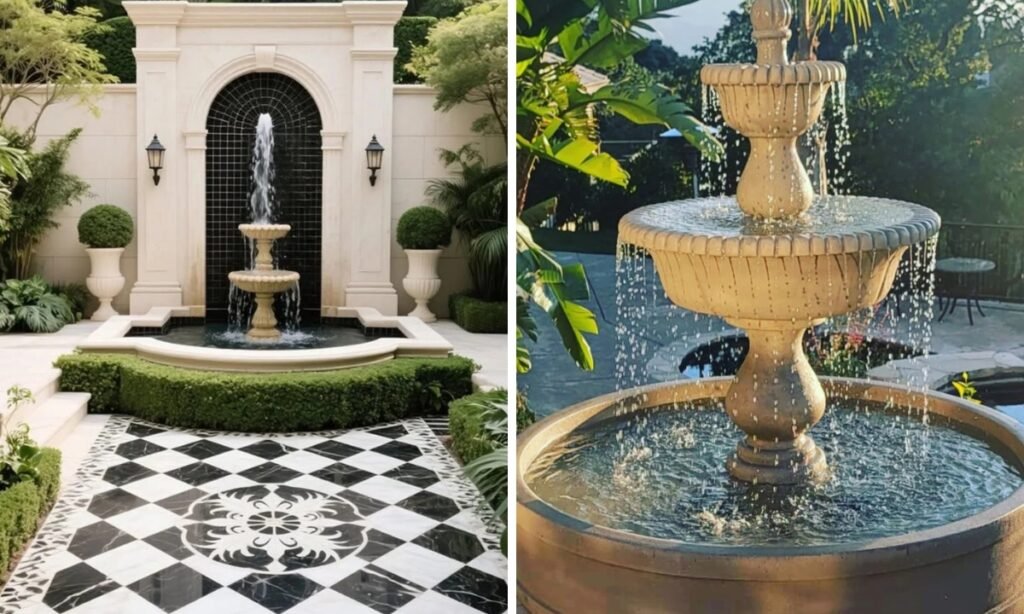
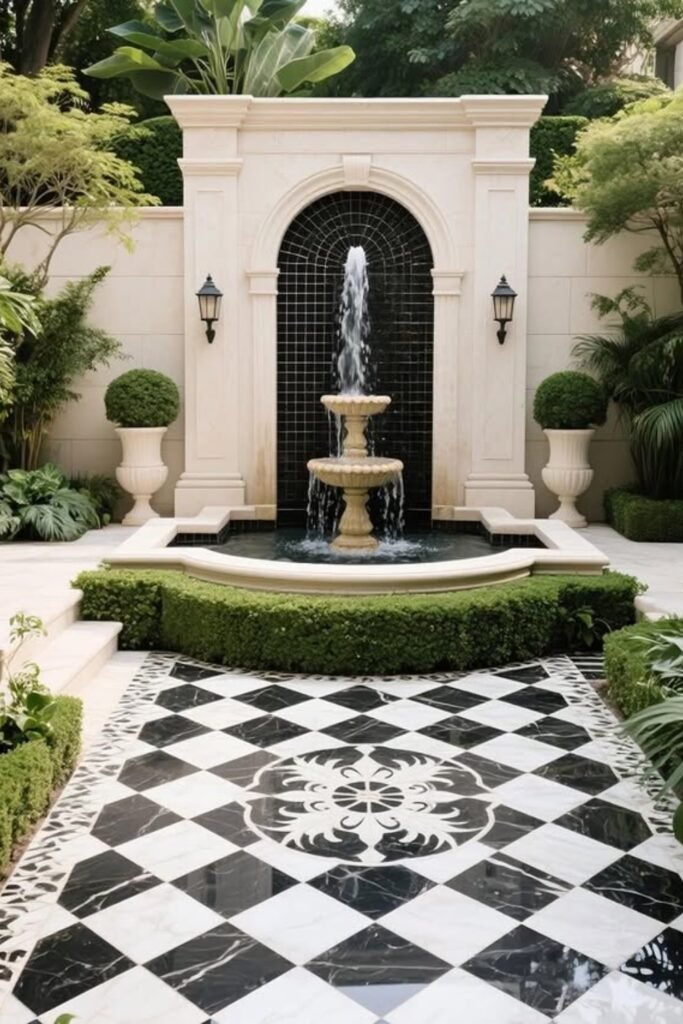
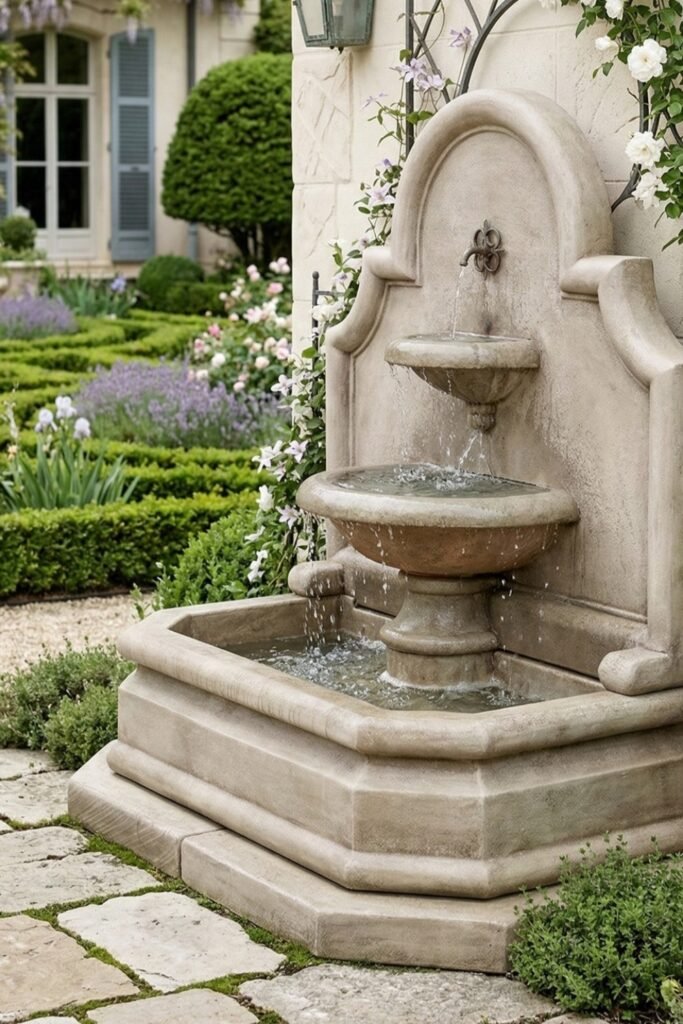
Frame The Fountain
A tall wall backdrop makes a DIY fountain feel more finished, especially in a front courtyard, patio corner, or formal garden path.
Recreate this look with a small tiered fountain placed against a simple painted wall, trellis panel, or arched screen.
Keep the basin wide enough to catch splash, then add plants on both sides so the fountain feels built into the space.
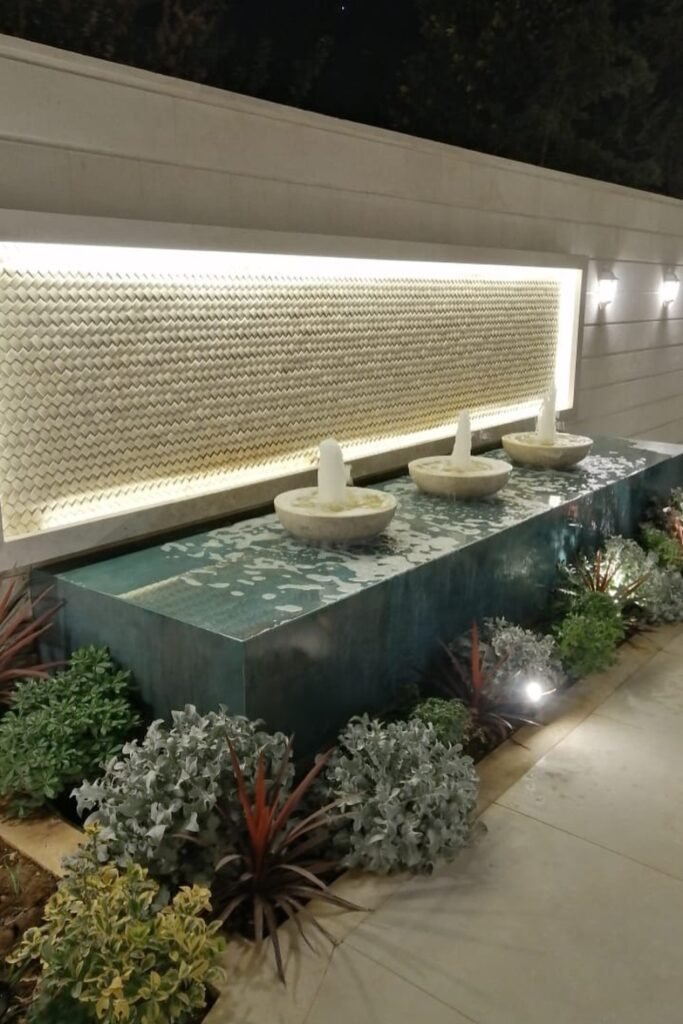
Light The Wall
Long narrow fountains work well beside walkways because they add water movement without taking over the whole yard.
Use a raised rectangular basin, then place small bubbling bowls across the top for a clean modern look.
Add backlighting behind the wall if you want the fountain to feel more expensive at night, but keep the pump access simple for cleaning.
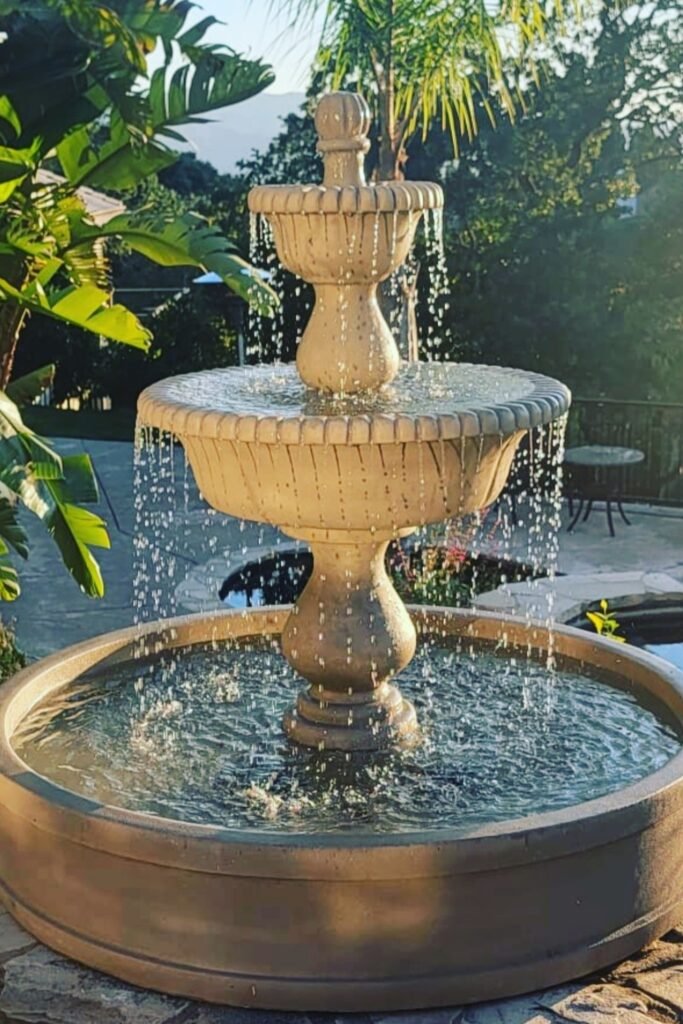
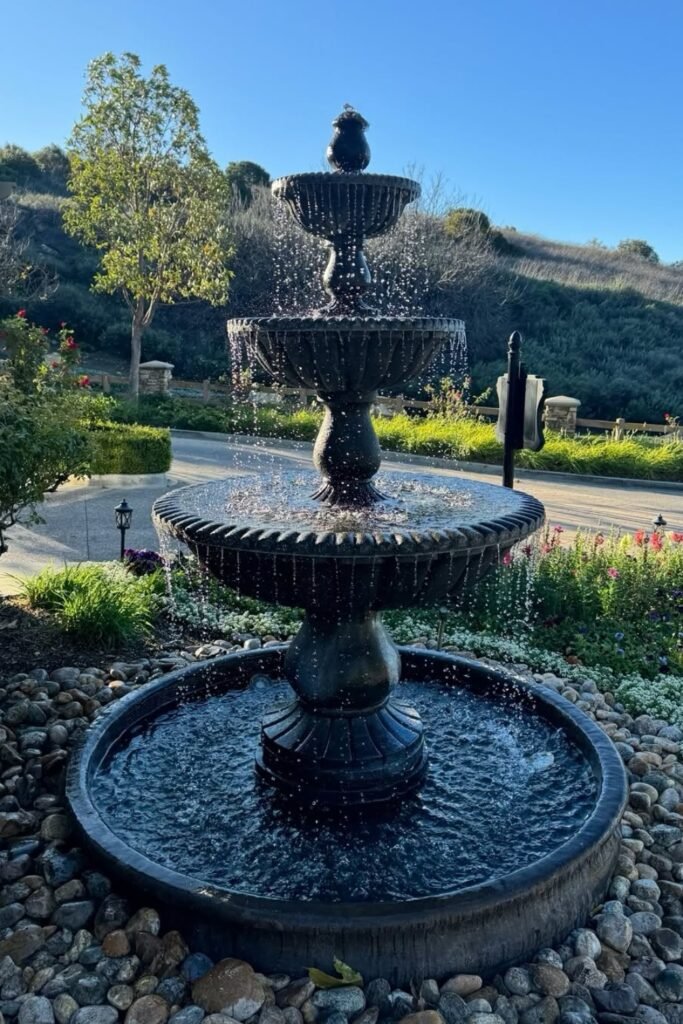
Build A Centerpiece
Go larger when you want the fountain to become the main feature, not just a small garden accent.
A tiered fountain works best in open patios, poolside areas, or wide backyard corners where water can fall without soaking nearby seating.
Use a deep round basin, keep the pump strong enough for the height, and leave space around it for easy cleaning.
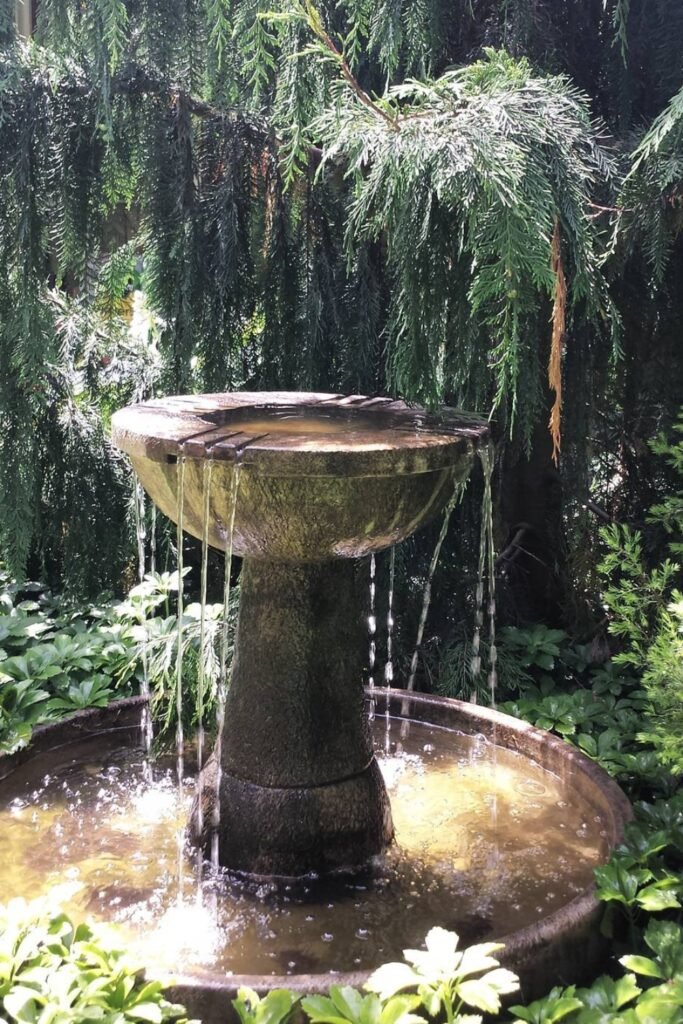
Tuck It Under Trees
A weathered fountain fits beautifully in a shaded garden because the mossy surface and falling water feel natural instead of polished.
Place it under tall trees, near ground covers, or beside a quiet sitting area where the sound can stand out.
Choose a wide lower basin so falling water stays contained, and check leaves often so the pump does not clog.
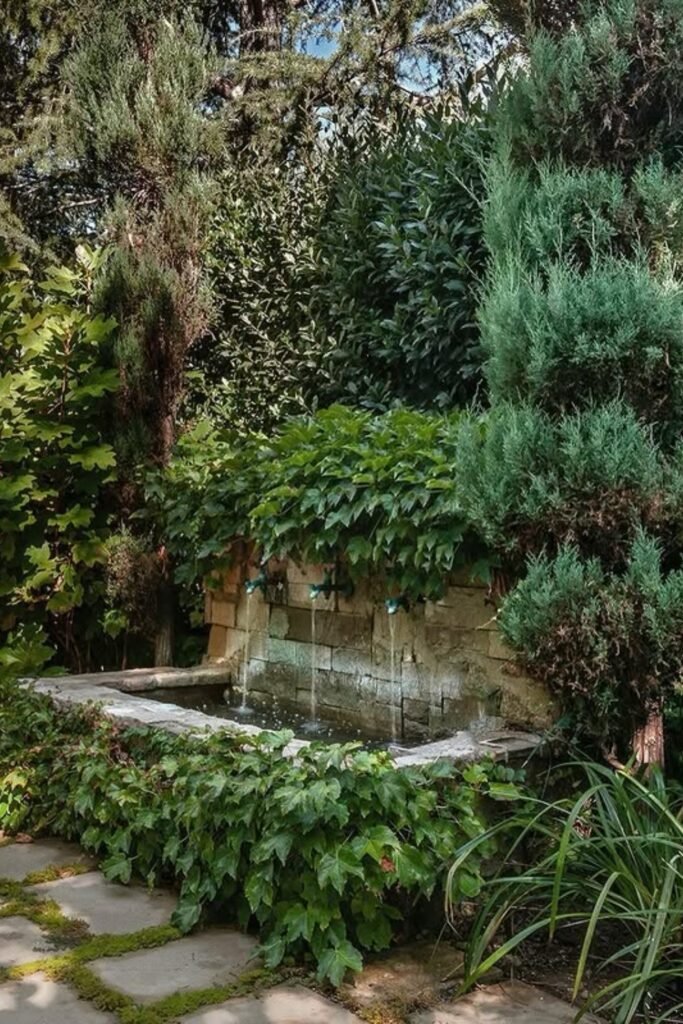
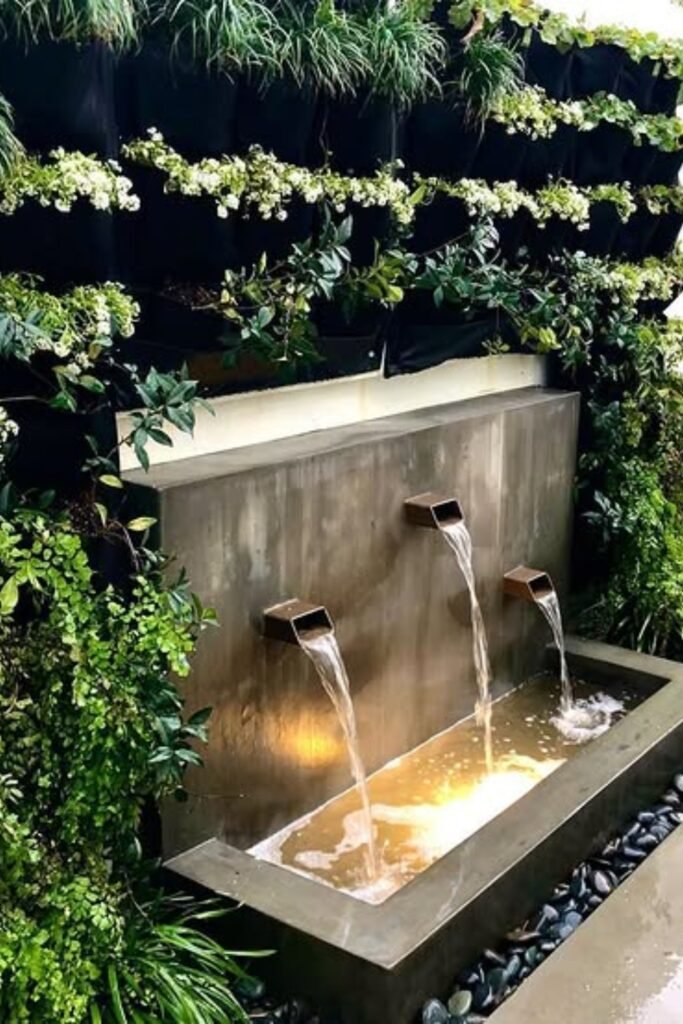
Use Wall Spouts
Wall spouts work best when you want a fountain that feels tucked into the garden instead of placed in the middle.
Build it against a stone or brick wall, then let several small outlets pour into one long basin.
Keep plants around the edges to soften the hard surface, but leave the front open so you can reach the water and clean the pump.
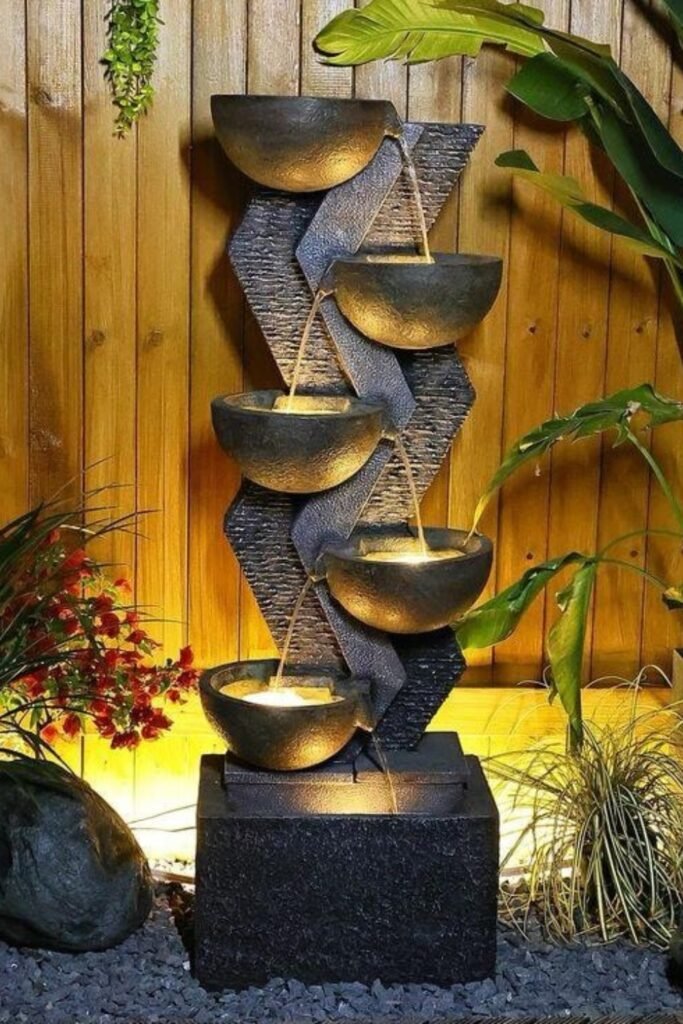
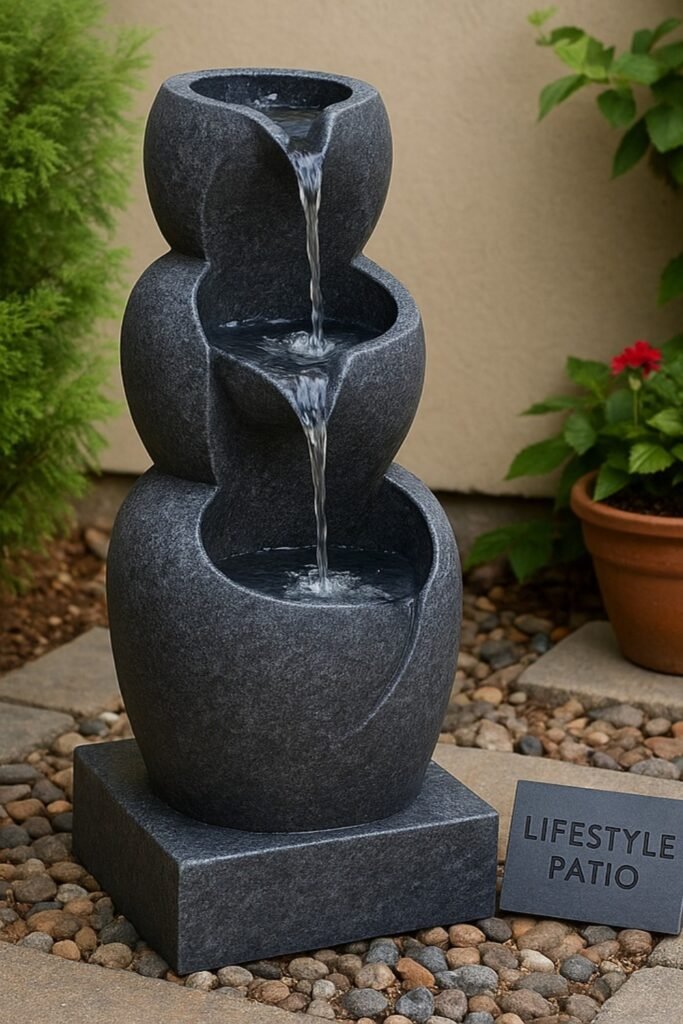
Stack Water Bowls
Tiered bowls are a smart choice when you want a fountain with height but do not have space for a wide basin.
Place it against a fence, garden wall, or patio corner so the water becomes a vertical feature.
Use staggered bowls to guide the flow down slowly, and add warm lighting near the base if you want it to stand out at night.
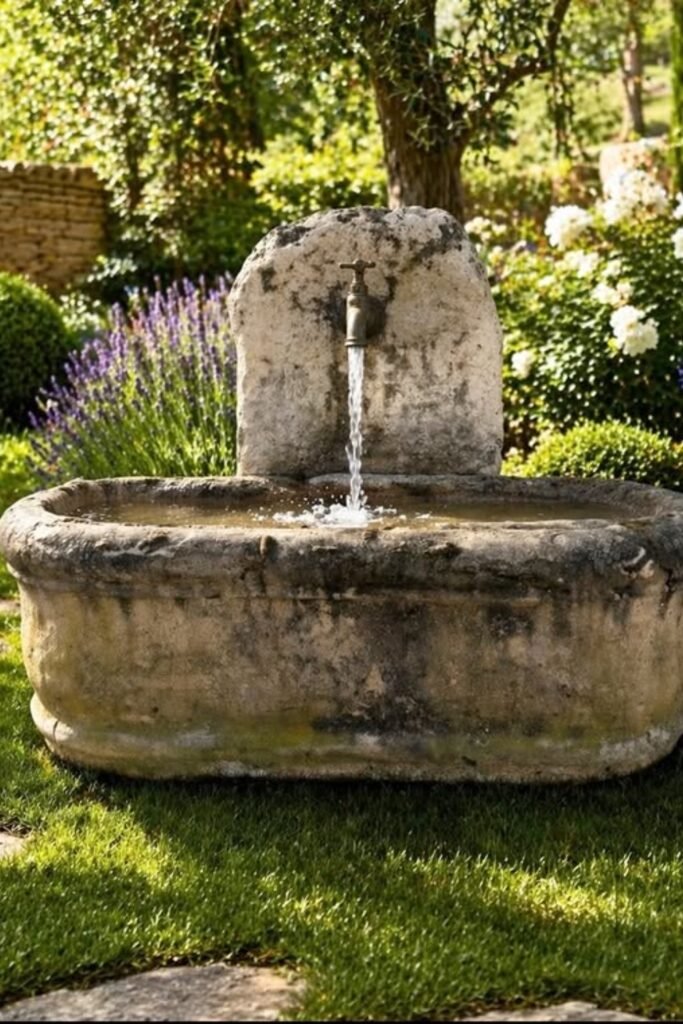
Add A Tap
An old stone trough can turn into a simple fountain when you let one tap become the main water source.
Use this style in cottage gardens, side yards, or near a walkway where the aged texture feels natural.
Keep the water drop short so it does not splash too much, and choose a hidden pump that recirculates water back through the tap.
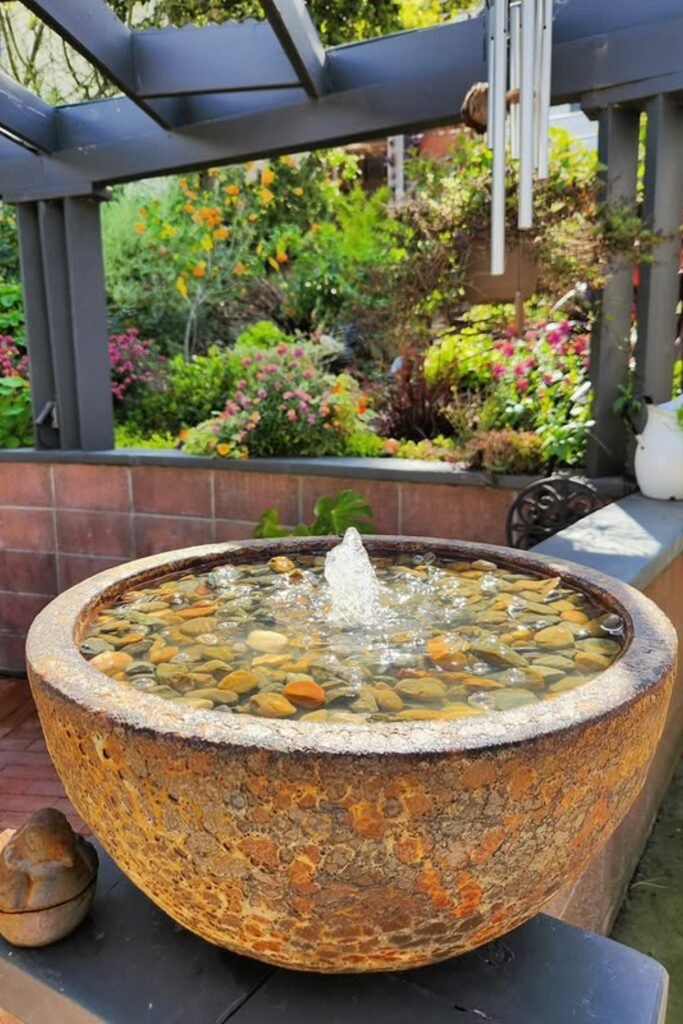
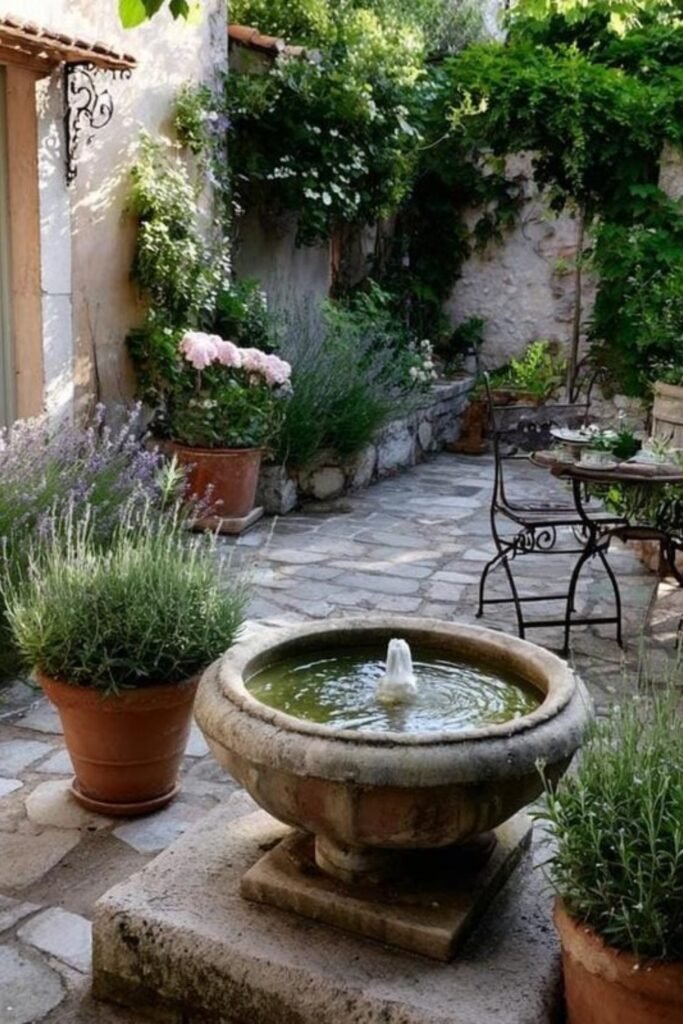
Fill A Stone Bowl
A wide stone bowl works well when you want a simple fountain for a patio table, pergola corner, or small garden sitting area.
Fill the top with smooth pebbles so the water feels clear and natural, then place a small bubbling pump in the center.
Keep the water level high enough because shallow bowls can lose water faster through sun and splash.
Anchor A Wall
A wall fountain gives a garden path a clear stopping point, especially when the yard already has flowers, hedges, or climbing plants.
Place the fountain against an exterior wall so the backdrop supports the whole design.
Use a deep lower basin to catch the falling water, and keep nearby vines trimmed so leaves do not fall into the pump area.
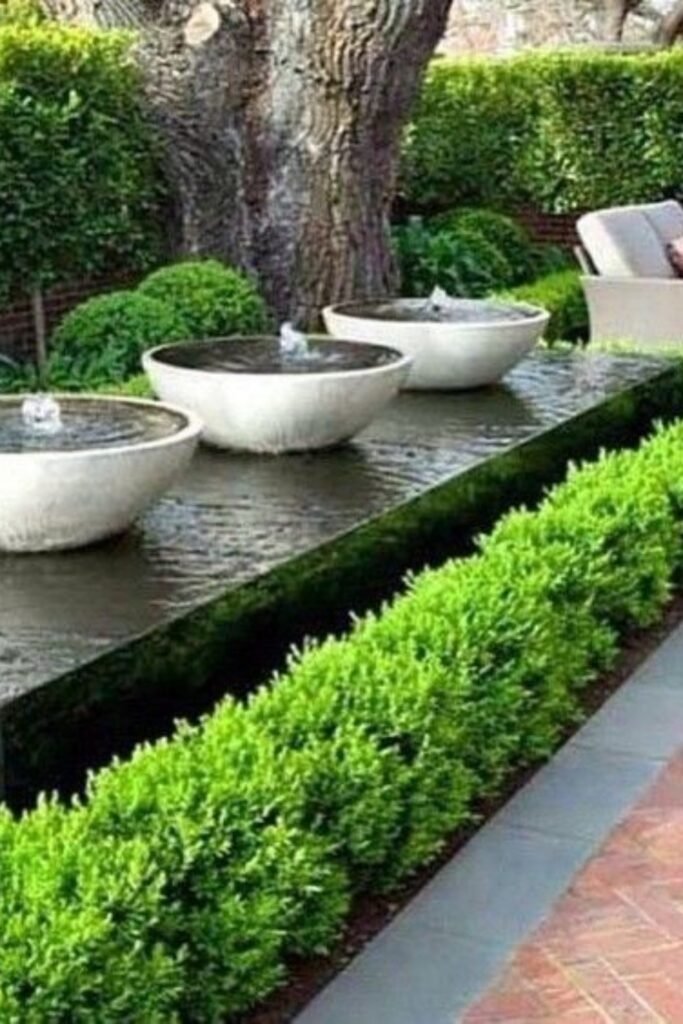
Line Up Bowls
Three bubbling bowls can make a long patio edge feel planned instead of empty.
Use a raised rectangular base if you want the fountain to sit beside hedges, seating, or a walkway.
Keep each bowl evenly spaced, then let the water overflow into one shared basin so the design feels calm, balanced, and easy to maintain.
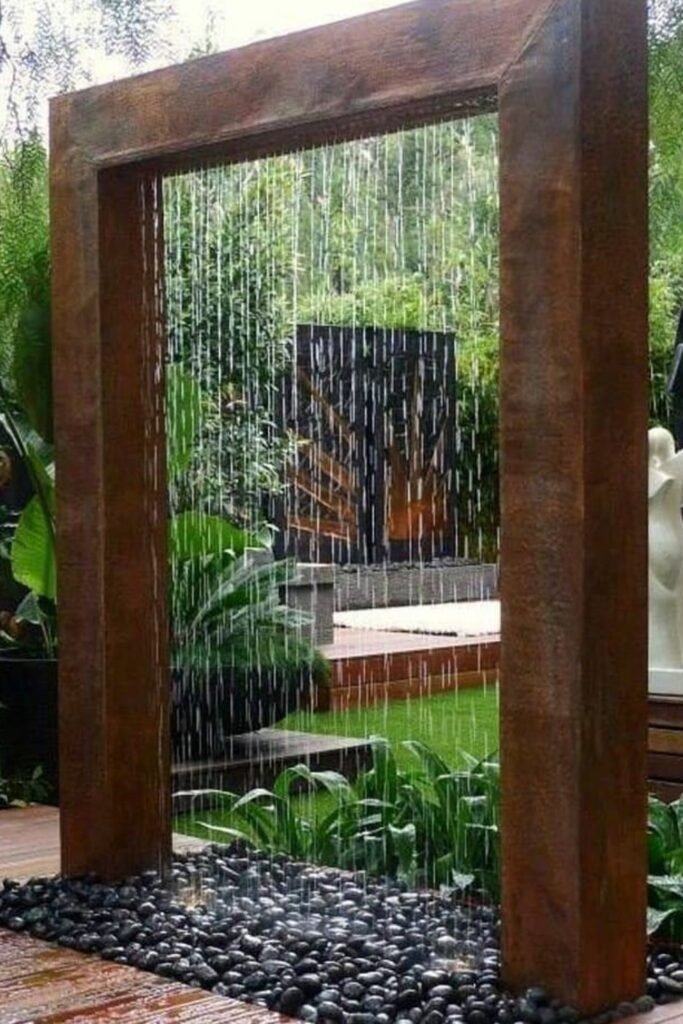
Create A Rain Wall
A rain wall fountain works best when you want water sound without a bulky center feature.
Build a strong rectangular frame, hide the pipe across the top, and let thin streams fall into a pebble-filled base.
Use it near a deck, garden entry, or seating corner, but make the lower basin deep enough so wind does not push water outside the frame.
Cascade Small Bowls
Stacked bowl fountains work well when you want height in a small patio, garden corner, or front entry without building a large basin.
Use three rounded containers with small spill openings so water can move from one level to the next.
Keep the base flat and stable, then place gravel around it to hide cords and make the fountain feel built into the landscaping.
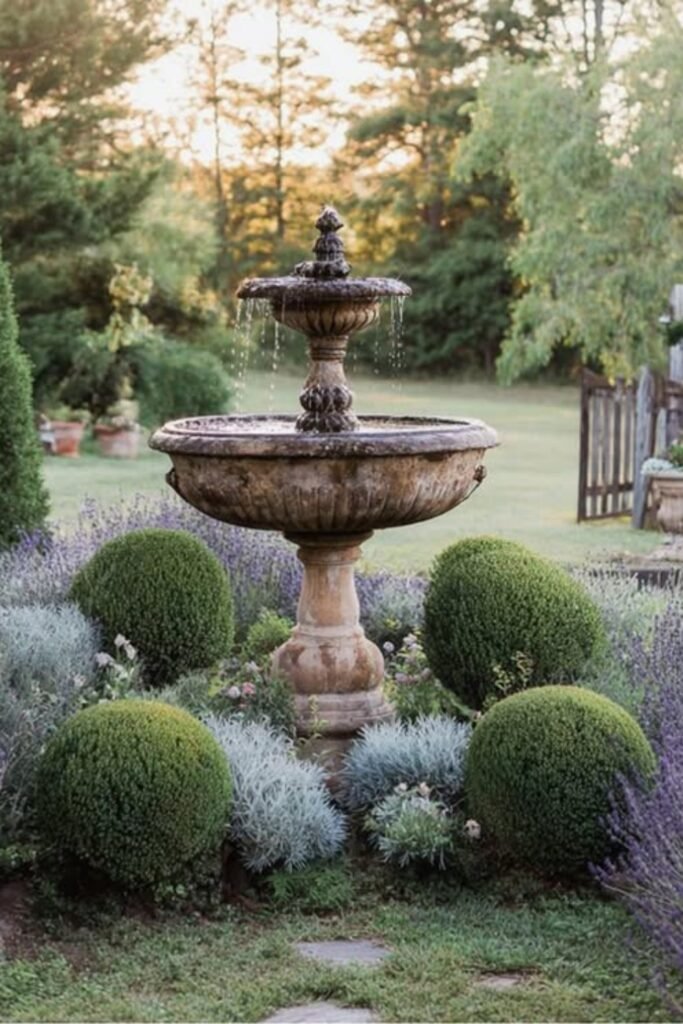
Center The Garden
A classic tiered fountain looks best when the planting around it gives the eye a clear center point.
Place it between lavender, round shrubs, or soft border plants so the fountain feels framed from every side.
Keep the surrounding plants low enough so they do not hide the bowls, and use a steady pump flow for a gentle falling sound.
Blend Wall Spouts
Wall spouts fit well when you want the fountain to feel modern but still soft enough for a planted garden.
Build a simple raised basin against a concrete or stone wall, then add two or three spouts for steady water movement.
Let trailing plants frame the top and sides, but keep the basin edge open so you can remove debris easily.
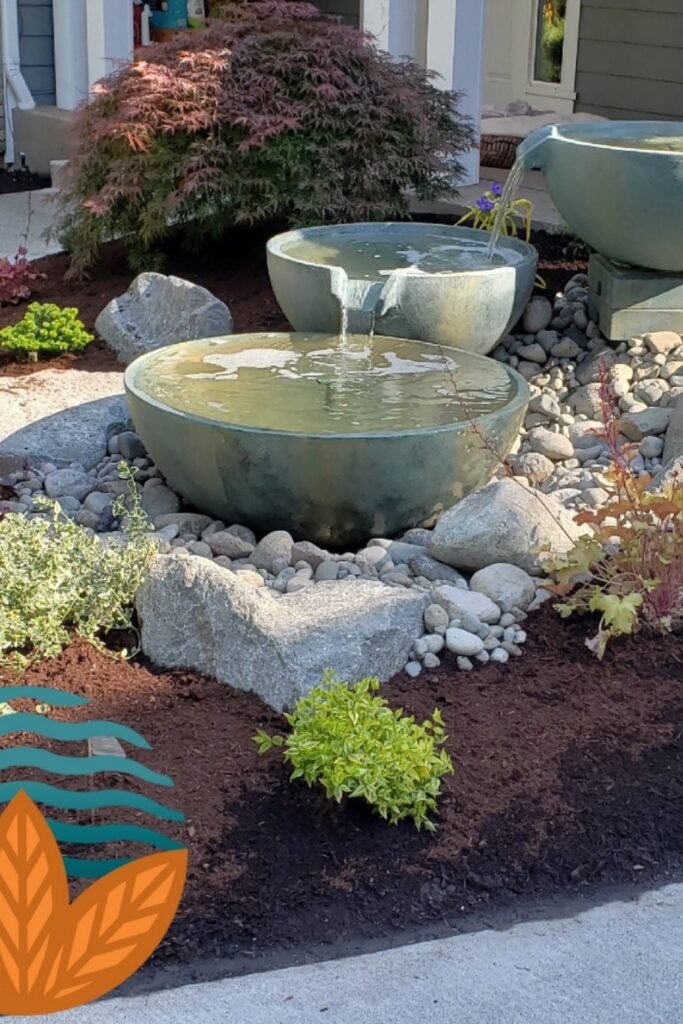
Raise A Bowl
A raised bowl fountain works perfectly in a small courtyard, stone patio, or garden seating corner because it adds water sound without needing a large pond.
Place the bowl on a sturdy base so it feels intentional, then use a small bubbling pump in the center.
Surround it with potted herbs, lavender, or soft plants to make the whole corner feel calm and finished.
Shape A Water Arch
A circular rain fountain makes the strongest impact when you want one piece to define the whole patio or deck.
Build a sturdy ring frame over a narrow catch basin, then run water evenly from the top so it falls like a curtain.
Leave enough open space around it because a design this bold looks best where people can walk around and enjoy it fully.

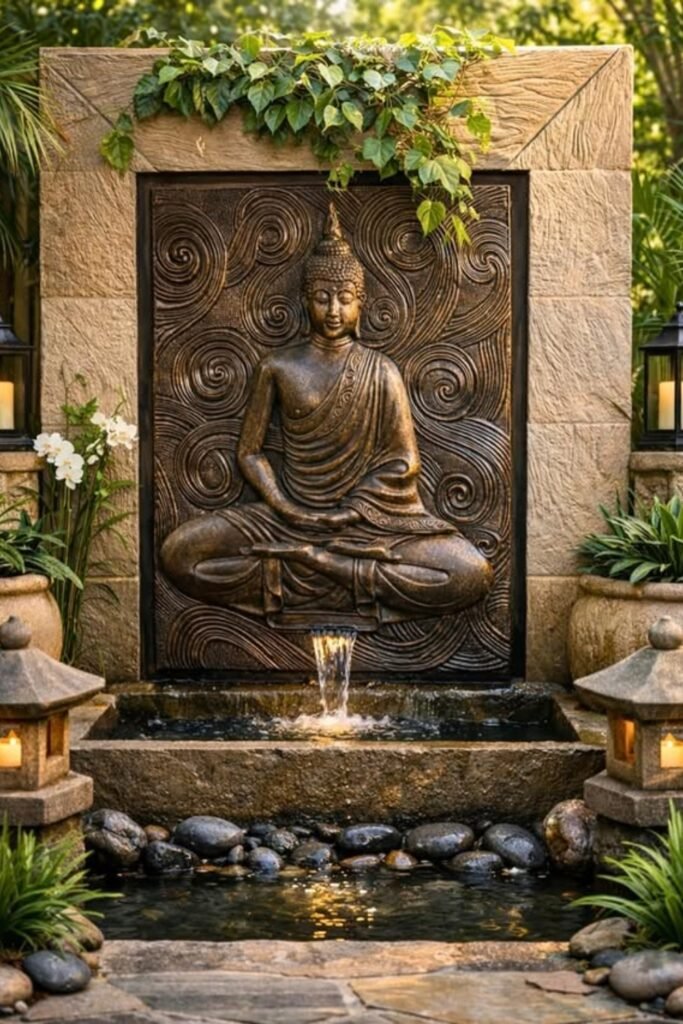
Add A Zen Panel
A carved wall panel can turn a small fountain into a peaceful garden feature, especially near an entry, meditation corner, or quiet patio wall.
Use a narrow basin at the bottom so the water falls cleanly without spreading too far.
Add river stones, soft plants, and lanterns around it if you want the space to feel calm instead of crowded.
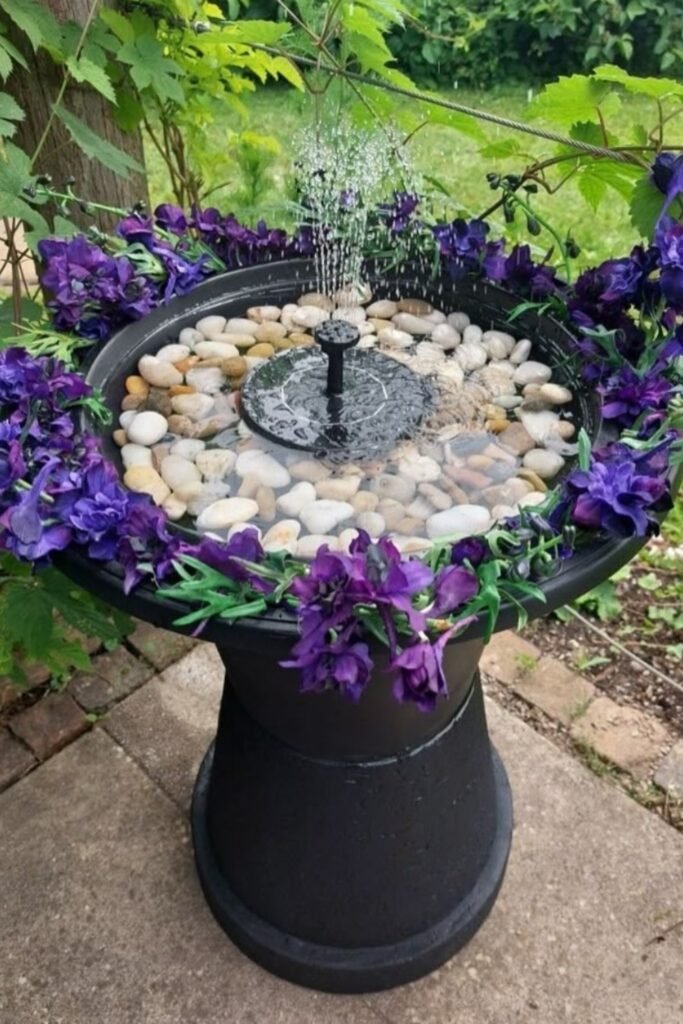
Dress A Birdbath
A birdbath fountain is one of the easiest DIY options because the shape already holds water and gives the pump a clear center point.
Use it in a garden corner, near a fence, or beside a small patio where birds can visit safely.
Add smooth pebbles to hide the pump, then use faux or real flowers around the rim for a softer handmade look.
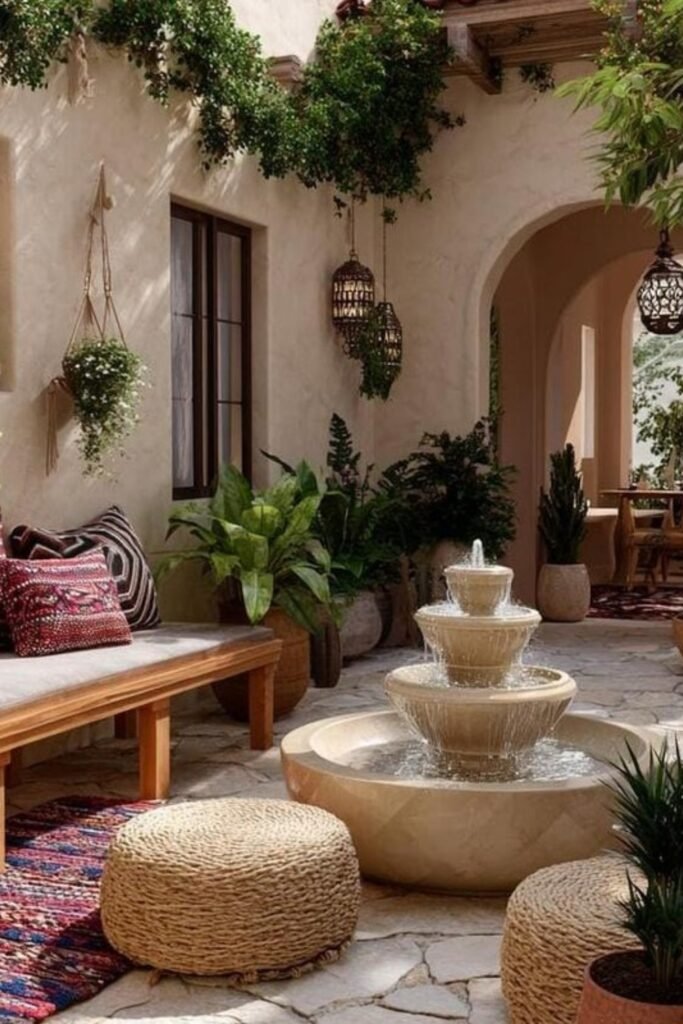
Set A Courtyard
A tiered fountain can make a courtyard feel like a real outdoor room when you place it close to seating, rugs, and potted plants.
Use a round basin with two or three upper bowls so the water sound stays soft but noticeable.
Keep enough walking space around it, and avoid placing cushions too close if the water splashes in windy weather.
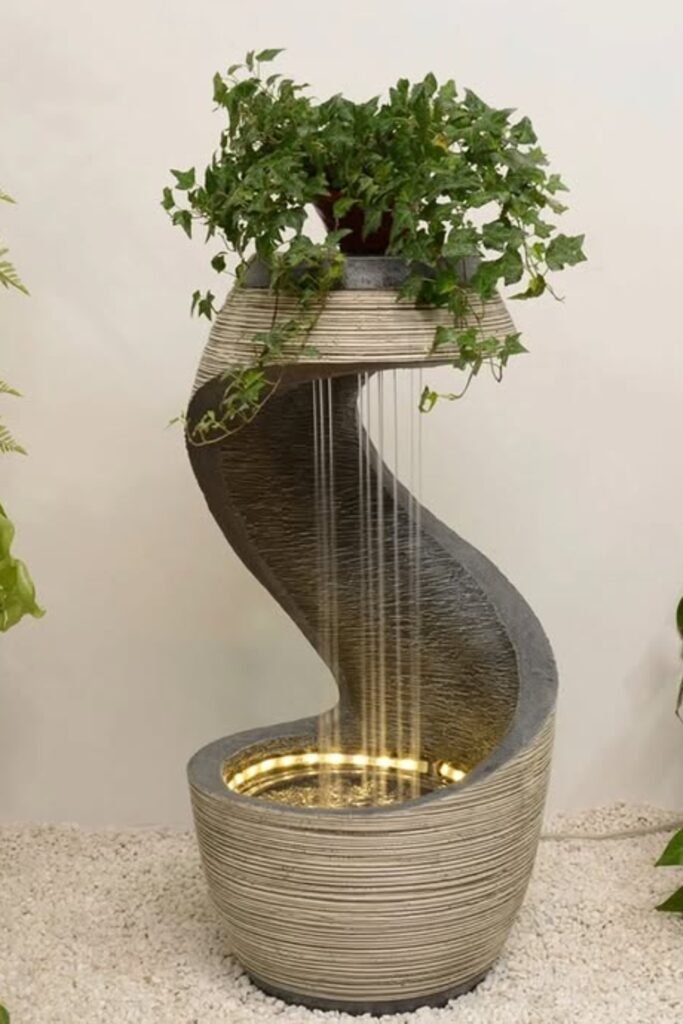
Add Plant Height
A planter fountain works well when you want water movement and greenery in the same small corner.
Use a tall sculptural base with a hidden pump, then place trailing plants at the top so the fountain feels alive instead of plain.
Keep the plant pot separate from the water channel if possible, because loose soil can fall down and block the pump.
Go Dark And Tall
A black tiered fountain makes a front yard or open driveway garden feel more formal without needing too many extra decorations.
Use this style when you have enough space around the fountain for water to fall freely.
Add river rocks around the base to control splash, then keep low flowers nearby so the tall shape stays visible from the path or entrance.
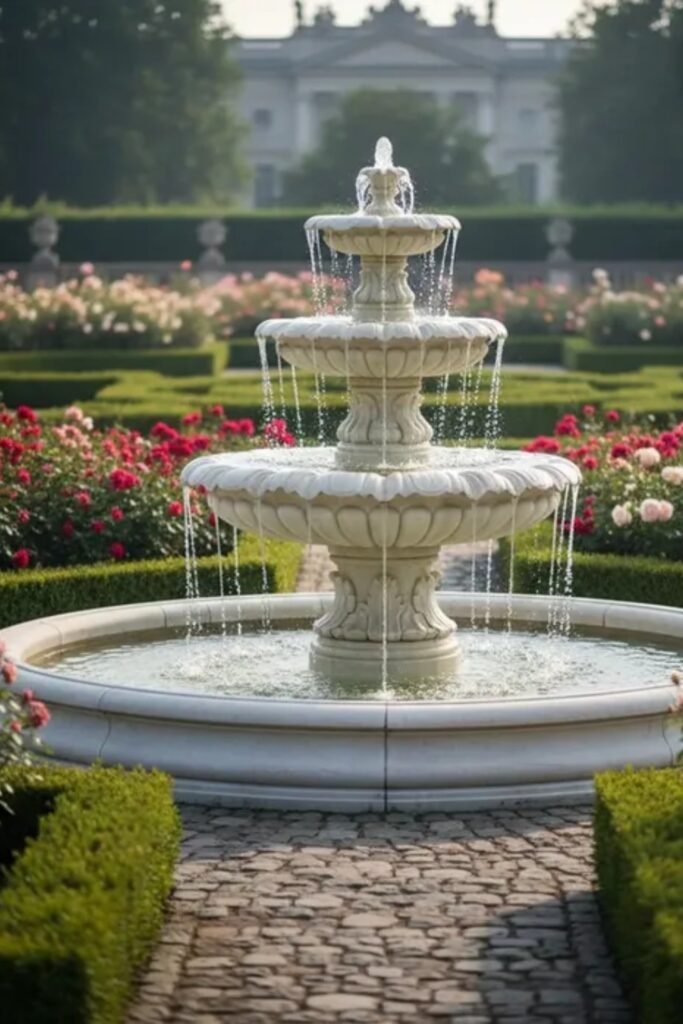
Frame With Flowers
A white tiered fountain works best when you want a formal garden to feel balanced from the walkway.
Place it in the center of flower beds, hedges, or a path so the water becomes the main view.
Keep the planting low around the basin, because tall flowers can hide the shape and make cleaning harder.
Drop Water Down
A vertical water wall works well when you want a fountain that feels tall and modern without using much floor space.
Build it against a stone panel, then let the water fall into a rounded lower basin.
Add lighting above or behind the water if you want it to glow at night, and keep the basin open enough for quick pump cleaning.

Place A Clay Bowl
A clay bowl fountain suits a courtyard, small patio, or garden path because it feels simple without looking unfinished.
Set the bowl on a stone base so it has height, then use a small bubbling pump in the center.
Surround it with lavender, herbs, or potted plants, but keep the rim clear so leaves do not fall into the water too quickly.

Step Down Bowls
Staggered bowls are great for a front yard bed because they make the fountain feel natural instead of flat.
Set each bowl at a slightly different height, then let the water spill from one container into the next.
Use river rocks around the base to hide the pump system, control splash, and connect the fountain with the surrounding plants.
Layer Corner Pots
Corner fountains work well when you have a plain brick wall and want to turn it into a small garden feature.
Stack pots, bowls, and stones at different heights so the water can fall in clear steps.
Add flowers on the top level and leafy plants around the base, but keep the pump area reachable so soil and roots do not block the flow.

FAQs
Can I make a DIY fountain without a big backyard?
Yes, you can make a DIY fountain even if you only have a small patio, balcony, porch corner, or narrow garden bed.
Choose a compact bowl fountain, birdbath fountain, or small stacked pot design instead of a large tiered setup.
If the space is tight, keep the basin wide but not too deep, and use a small adjustable pump so the water does not splash outside the container.
What is the biggest mistake to avoid when making a DIY fountain?
The biggest mistake is hiding the pump so deeply that you cannot clean it later.
A fountain may look better when the pump is fully covered with stones, but dirt, leaves, and algae can block the water flow over time.
Keep the pump hidden enough to look neat, but make sure you can lift it out easily whenever the water starts to slow down.

Hi, my name is Zeeshan, and I am the founder of The Crafts Geek. I have been passionate about DIY projects, home organization, and creative problem-solving for years. Over time, I realized that simple storage solutions and practical DIY ideas can make a huge difference in how a home looks and functions.