Your shed wasn’t always this messy… but now it’s at a point where you don’t even feel like going inside.
Tools are piled up, things are hard to find, and every time you need something, it turns into a frustrating search.
You know you should organize it but the problem is, you don’t know where to start.
Most advice online just throws random tips at you, which only makes it feel more overwhelming.
In this artic;e, I’ll walk you through a simple, step-by-step system to turn your messy shed into a clean, easy-to-use space.
Why Your Shed Gets Messy So Fast
Your shed doesn’t suddenly become messy. It happens little by little.
You put one tool down without thinking, leave a box in the corner, or stack things just to “deal with later,” and over time it turns into a cluttered space that feels hard to manage.
The main reason behind this is simple: there is no system in place. Most people store things wherever they find space instead of giving each item a fixed place.
Gardening tools, equipment, and random storage items all get mixed together, which makes everything harder to find.
Another reason is limited space. When a shed is small and you only use the floor, things pile up quickly.
You also build habits without realizing it. If you don’t have a proper place to return items, you stop putting them back properly.
The problem is not the lack of storage, it’s the lack of structure. Once you fix that, everything becomes easier to manage.
A Simple 4-Step System to Organize Your Shed
If your shed feels overwhelming, you don’t need complicated ideas. You just need a simple system that guides you from start to finish.
The first step is to take everything out of the shed so you can clearly see what you have.
This may feel like extra work, but it actually makes the process easier because you’re not trying to organize around existing clutter.
Once everything is out, sort your items into clear groups based on what you want to keep, remove, or move elsewhere.
After that, clean your shed properly so you’re working with a fresh space. The final step is planning before putting anything back.
This is where most people make mistakes because they rush to refill the shed without thinking.
When you follow these steps in order, the process becomes simple and manageable instead of stressful and confusing.
This method works because it removes guesswork and gives you a clear direction.
Step 1: Take Everything Out
The most important step is also the one most people skip or rush through. You need to empty your shed completely so you can start fresh.
When everything is out, it becomes easier to understand how much space you actually have and what you’re dealing with.
As you go through your items, you need to be honest about what you really use.
Many sheds are filled with broken tools, old materials, and things that haven’t been used in years. These items take up valuable space without adding any value.
If something is damaged and you haven’t fixed it yet, there’s a good chance you never will.
If you have multiple versions of the same tool, keeping one is enough. You should also remove items that don’t belong in the shed at all.
This step alone can clear out a large portion of the clutter and make everything else easier. The less you keep, the easier it becomes to organize.
Step 2: Plan Where Everything Should Go
Before putting anything back, you need to pause and think about how your shed should work.
Most people clean their shed and then immediately start putting things back randomly, which is why the mess returns quickly.
Instead, you should plan where everything will go based on how often you use it. Items you use regularly should be easy to reach and placed near the entrance.
Things you use less often can go further back or higher up. It also helps to group similar items together so everything has a clear place.
For example, gardening tools should stay in one area while equipment or storage items should have their own sections.
This doesn’t need to be perfect or complicated. Even a simple plan makes a big difference.
When you decide where things belong before placing them, you create a system that is easy to follow and maintain.
Step 3: Use Your Wall and Ceiling Space
One of the biggest mistakes people make is relying only on floor space. When everything is placed on the ground, it fills up quickly and creates clutter.
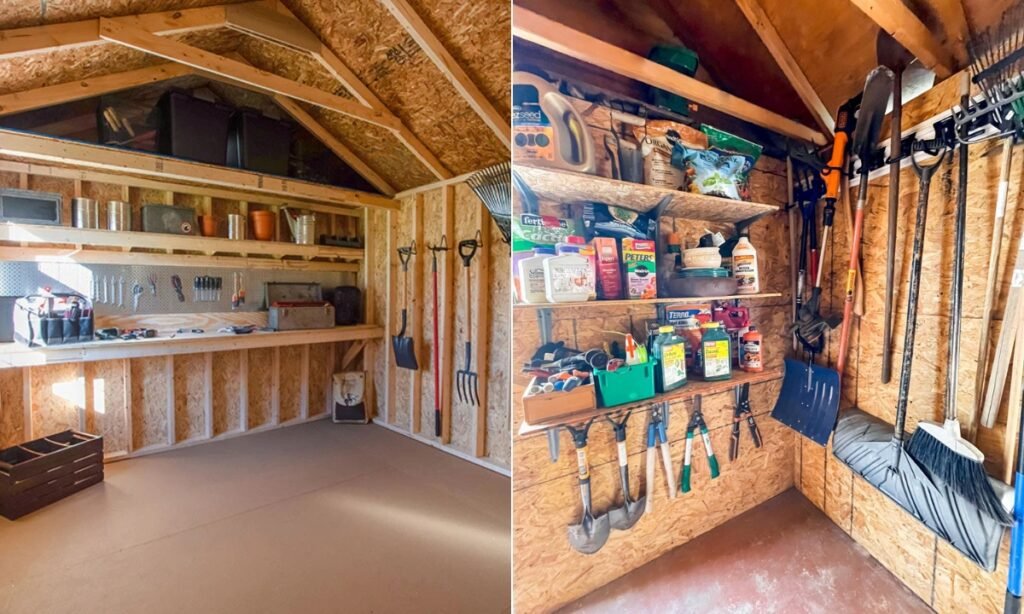
The easiest way to fix this is by using your walls and ceiling. Hanging tools like shovels, rakes, and hoses keeps them organized and easy to access while freeing up space below.
Shelves can hold bins, boxes, and items you don’t need every day. Even the back of the door can be used for storage with simple hooks or racks.
If you need extra space, the ceiling is a great place for storing seasonal or rarely used items.
When you start using vertical space, your shed instantly feels larger and more organized.
It also becomes easier to move around and find things because everything is visible instead of piled up.
Step 4: Pick the Right Storage
You don’t need expensive or complicated storage systems to organize your shed. Simple solutions often work best because they are easy to use and maintain.
Clear containers help you see what’s inside without opening them, which saves time and effort. Labeling them makes things even easier to find.
Small items like screws and nails can be stored in jars or containers to prevent them from getting lost.
Larger tools can be kept in racks so they stay in place instead of leaning against walls.
The key is to avoid overcomplicating things by buying too many organizers. If your system is too complex, you won’t use it properly.
The goal is to create a setup that feels natural and easy to follow every time you use your shed.
How to Divide Your Shed into Easy-to-Use Sections
Dividing your shed into sections helps you keep everything in order and prevents items from getting mixed together.
Instead of treating your shed as one open space, think of it as a place with different areas for different purposes.
You can keep gardening tools in one section, equipment in another, and storage items in a separate area.
This makes it easier to find what you need and also makes it easier to return items after use.
It’s also important to think about how often you use things.
Items you use frequently should be placed in convenient spots, while less-used items can be stored in harder-to-reach areas.
This simple structure creates a system that makes your shed more practical and easier to manage over time.
How to Organize a Small Shed Without Running Out of Space
When you have a small shed, you need to be more careful with how you use space. The key is to avoid filling up the floor and instead focus on vertical storage.
Shelves, hooks, and wall-mounted solutions help you store more without taking up extra room.
You can also use the door for additional storage by adding hooks or small racks.
Choosing compact storage options instead of bulky cabinets helps keep the space open.
It’s also important to limit what you keep because a small shed cannot hold everything. Being selective about what stays makes a big difference.
With the right approach, even a small shed can feel organized and functional instead of cramped.
Important Safety Tips Most People Ignore
Safety is often overlooked when organizing a shed, but it should be a priority.
Items like chemicals, fuel, and fertilizers should be stored properly in sealed containers and kept away from children or pets.
Sharp tools should not be left lying around and should be stored in a secure and organized way.
Heavy items should be placed on lower shelves to reduce the risk of accidents. It’s also important to keep pathways clear so you can move safely inside the shed.
Good ventilation is another factor, especially if you store chemicals or fuel.
Taking these simple precautions helps you avoid risks and makes your shed a safer place to use.
Cheap vs Better Storage Ideas (What’s Worth It?)
Organizing your shed doesn’t have to be expensive.
You can start with simple and affordable solutions like using jars for small items, crates for storage, and basic hooks for tools.
These options work well and can make a noticeable difference without costing much.
If you want something more durable or long-term, you can invest in better storage systems like strong shelves or wall-mounted setups.
The important thing is to focus on what you actually need instead of buying unnecessary items.
Both budget and premium options can work effectively as long as they fit your space and usage.
How to Keep Your Shed Clean Without Extra Effort
Once your shed is organized, the next challenge is keeping it that way.
The easiest way to do this is by building simple habits. Every time you use something, put it back in its place instead of leaving it out.
This small action prevents clutter from building up again. It also helps to do quick checks regularly so small messes don’t turn into bigger problems.
A seasonal cleanup can also help you remove items you no longer need.
Keeping your shed organized doesn’t require a lot of effort if you stay consistent with these simple habits.
Quick Things You Can Do Today to Improve Your Shed
If you don’t have time to fully organize your shed, you can still make small improvements that have a big impact.
Clearing some floor space, hanging a few tools, or organizing a small section can make your shed easier to use right away.
These quick changes help you see progress without feeling overwhelmed.
Once you notice the difference, it becomes easier to continue organizing the rest of the space.
Conclusion
Organizing your shed doesn’t have to be complicated or stressful.
When you follow a simple system and keep things practical, the process becomes much easier.
The goal is not perfection but creating a space that works for you.
With a clear plan and small consistent efforts, your shed can stay clean, organized, and easy to use for a long time.

Hi, my name is Zeeshan, and I am the founder of The Crafts Geek. I have been passionate about DIY projects, home organization, and creative problem-solving for years. Over time, I realized that simple storage solutions and practical DIY ideas can make a huge difference in how a home looks and functions.